Integrating Fastlane by PayPal with your custom checkout
Fastlane by PayPal is a guest checkout solution for card payments that allows you to leverage PayPal’s network to recognize millions of shoppers and provide them with a fast, frictionless checkout using their securely saved credentials in as little as one click.
Stores using checkout-js v1.624.1 or higher support payments with Fastlane by PayPal out of the box. If your store uses an earlier version, you will need to integrate Fastlane by following the instructions in this article.
Only configure Fastlane by PayPal for guest customers. Fastlane does not support logged-in customers.
Requirements
Fastlane by PayPal is available for users of the Braintree or PayPal payment gateways. Your store must be located in the US, the UK, or Australia and you must offer one of the supported transactional currencies. See Fastlane by PayPal for a complete list of setup requirements.
Before following the integration steps, ensure your custom checkout project is using the latest version of checkout-sdk. We recommend reviewing the README file to familiarize yourself with checkout service usage.
Lastly, confirm that Fastlane by PayPal is ready for implementation with the checkout-settings request. Check the value of the providerWithCustomCheckout field.
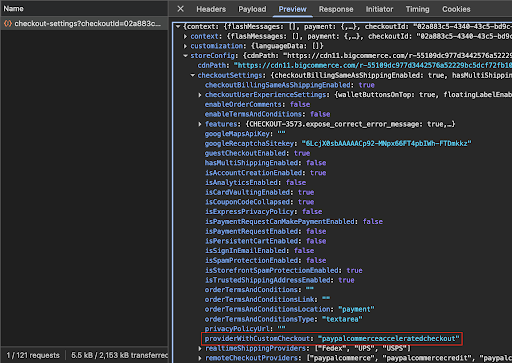
This field can have one of the following values, corresponding to the configured payment provider:
braintreeacceleratedcheckout- Fastlane is enabled via the Braintree payment gateway.paypalcommerceacceleratedcheckout- Fastlane is enabled via the PayPal payment gateway.
During integration, you can choose to implement Fastlane with the supported payment provider, or you can implement it for all providers.
If providerWithCustomCheckout does not have a value, then Fastlane is not currently enabled in your payment gateway settings in the control panel.
Configuring Fastlane in the customer step
The Fastlane authentication process should be triggered in the customer step. The authentication logic for Fastlane is already implemented in checkout-sdk.
Step 1: Get providerWithCustomCheckout
Use the following code to obtain the providerWithCustomCheckout value from checkout-sdk.
Step 2: Initialize the customer step
To load the payment method configuration and initialize the Fastlane SDK for use across the entire checkout page, call checkoutService.initializeCustomer when a shopper opens the customer step.
Use the following code:
See the Checkout JS repository for an example of how checkoutSevice.initializeCustomer is used.
Step 3: Render the Fastlane by PayPal watermark
After initialization, you can reference the Fastlane SDK via window.paypalFastlane (for the PayPal payment gateway) or window.braintreeFastlane (for the Braintree gateway).
The example script below uses window.paypalFastlane to render the Fastlane watermark.
See the Checkout JS repository for an example of rendering the Fastlane watermark.
Step 4: Configure the Fastlane by PayPal authentication process
Use the following methods to configure Fastlane authentication.
checkoutService.continueAsGuest- This saves the shopper’s email address to the checkout state.checkoutService.executePaymentMethodCheckout- This triggers the Fastlane authentication check for shoppers with an existing Fastlane account.onContinueAsGuest- This is a callback method that proceeds to the next step of checkout.
In the default checkout, these methods are triggered when the shopper clicks on the Continue button after filling up email input.
Use the following code, or see the Checkout JS repository for an example of how to implement the authentication methods.
Step 5: De-initialize the customer step
Call the checkoutService.deinitializeCustomer method before the customer step is closed. This informs the checkout service that the customer step was completed.
Use the following code:
Default customer step example
The images below depict the Fastlane by PayPal customer step as it appears in the default checkout.
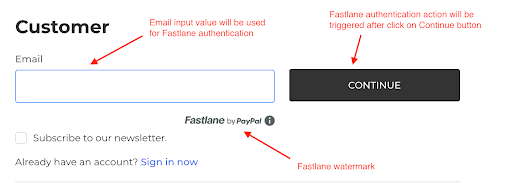
The customer step of checkout with Fastlane implemented
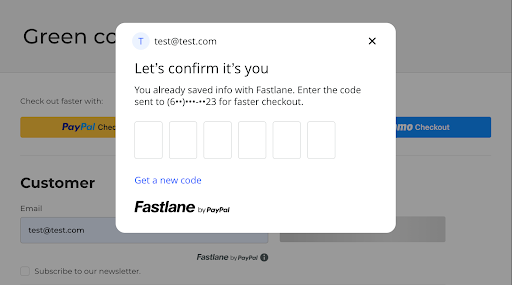
The authentication modal for shoppers with a Fastlane account
Configuring Fastlane in the shipping step
With Fastlane by PayPal, the shipping step of checkout differs based on whether the shopper has an existing Fastlane account. Shoppers without an account use the default checkout flow. For shoppers with an account, the Fastlane Shipping component automatically populates the default address saved to their account. They can select another saved address as needed.
Step 1: Render the default shipping address from Fastlane
After a shopper authenticates their Fastlane account in the customer step, you can access certain data from Fastlane. CustomerFastlaneData should contain an object like this:
Use customerFastlaneData.addresses[0] to render the default shipping address information.
Step 2: Render the Fastlane logo
The Fastlane logo should appear where the Fastlane address is used. See the Checkout JS repository for an example of how you can render the logo SVG file.
Step 3: Initialize the shipping step
Use the checkoutService.initializeShipping method to initialize shipping through checkout-sdk. As part of this step, you should also create a variable for the showPayPalFastlaneAddressSelector callback, as we will use it in the next step.
The following code includes options for each payment provider, but you can omit the options not associated with your connected gateway.
See the Checkout JS repository for an example of shipping initialization.
Step 4: Render the Fastlane shipping component
When a shopper clicks the Edit button, the shipping component should appear with a list of their saved addresses. Create an event handler that calls renderFastlaneAddressComponent from the previous step and save the selected address.
See the Checkout JS repository for an example of this configuration. Since Checkout JS is a React application, the click event handler is saved as a ref variable.
Step 5: De-initialize the shipping step
Call the checkoutService.deinitializeShipping method before the shipping step is closed. This informs the checkout service that the shopper has selected a shipping address and a shipping method.
Use the following code:
See the Checkout JS repository for an example of shipping de-initialization.
Default shipping step example
The images below depict the Fastlane by PayPal shipping step as it appears in the default checkout.
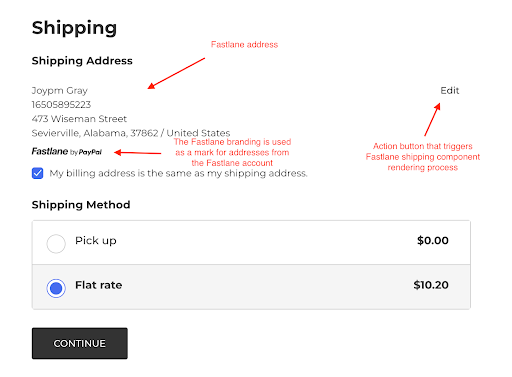
The shipping step of checkout with Fastlane implemented
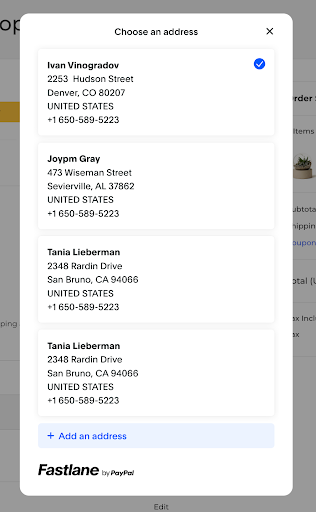
The Fastlane shipping component with several saved addresses
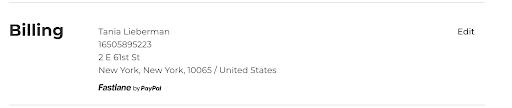
Configure Fastlane in the billing step
The only required change for Fastlane by PayPal in the billing step is to render the Fastlane logo under the billing address. The logo should only appear if the selected billing address is associated with the shopper’s Fastlane account. This is how the logo appears in the billing step of the default checkout.
In step 2 of the Customer Step instructions, we provided an example of how you can render the logo SVG file. You can also review the Checkout JS repository for examples of how to:
- Render the logo in the billing address component
- Conditionally display the logo under Fastlane addresses
Configure Fastlane in the payment step
Your checkout should only render Fastlane by PayPal at the payment step when one of the following payment provider IDs is present in the payment request:
braintreeacceleratedcheckoutbigcommercepaymentsfastlane
Fastlane’s payment step has separate flows for shoppers with and without an existing Fastlane account. For shoppers with an account, the Fastlane SDK renders their default credit card details in the payment step, as well as a stored card selector for selecting a different saved card. If the shopper does not have a Fastlane account, they are presented with an option to create an account and save their payment credentials.
Step 1: Initialize the payment step
Use the checkoutService.initializePayment method with a set of options to initialize the payment step. The options should save the callbacks for rendering the Fastlane credit card components and the stored card selector to respective variables for later use.
Use the following code:
The Checkout JS repository includes examples of the initialization setup for Braintree and PayPal implementations.
Step 2: Define which component should be rendered on the page
The following code creates a variable that checks if a shopper has a Fastlane account with a saved payment instrument.
If shouldShowInstrumentsForm is true, the checkout should render the payment instrument component in step 4. If false, it should render the credit card form in step 3.
See the Checkout JS repository for examples of the variable in the Braintree and PayPal implementations.
Step 3: Render the Fastlane credit card form
The credit card form allows shoppers without a Fastlane account to enter their credit card details and create an account.
Use the renderPayPalFastlaneCardComponent callback saved in step 1 to render the form. Use the following code:
The Checkout JS repository includes examples of rendering the credit card form for Braintree and PayPal implementations.
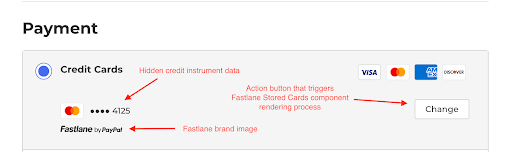
Step 4: Render the Fastlane instruments component
The card instrument component relays the default card from the shopper’s Fastlane account at the payment step and renders the Fastlane logo. It also presents a Change button for shoppers to select a different saved card. See the following sub-steps:
Step 4a: Get Fastlane instrument data
This should return information related to the default card. Use the following code:
You can then use defaultCardInstrument.brand to render the credit card brand icon and defaultCardInstrument.last4 to render the last four digits of the card.
Step 4b: Configure the card selector event handler
Create a click handler for the Change button that calls the showPayPalFastlaneCardSelector callback from step 1. This returned instrument data is used to render credit card information. Step 4 of the Shipping step includes an example of how the Checkout JS repository uses a click handler to call a callback method.
Once returned, save it to selectedInstrument.bigpayToken and pass it as an instrumentId value in the data payload of checkoutService.submitOrder. See the Checkout JS repository for an example of the submitOrder method.
Step 4c: Render the Fastlane logo
The logo should appear under the credit card details. See step 2 of the Customer Step instructions for an example of how you can render the logo SVG file.
Step 5: De-initialize the payment step
Use the checkoutService.deinitializePayment method to de-initialize the payment step. This should be called when a shopper completes the payment step, or if they return to a previous step of checkout.
The Checkout JS repository includes examples of payment de-initialization for Braintree and PayPal implementations.
Default payment step example
The images below depict the different elements of Fastlane’s credit card and payment instrument components.
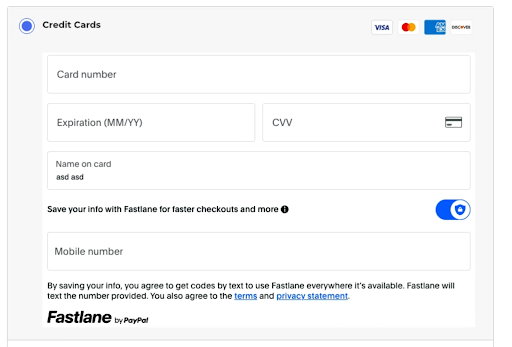
The Fastlane credit card form for guests without an account
The Fastlane credit card form for guests with an existing account
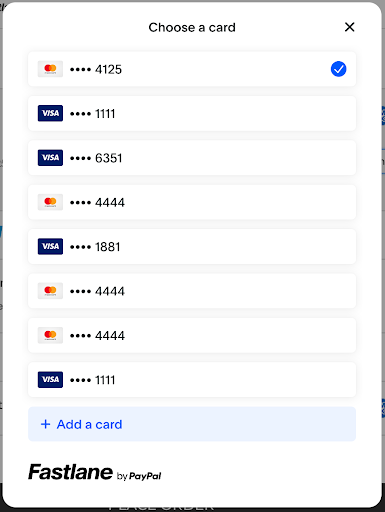
The Fastlane credit card selector
Resources
Source code
- Checkout JS repository (BigCommerce GitHub)
- Checkout SDK repository (BigCommerce GitHub)