Lab - Add a Subcategory Listing in Stencil
This lab provides a comprehensive walkthrough of customizing your storefront’s category pages. You will learn how to add dynamic subcategory listings, giving you practical experience with Stencil templating. You’ll also learn how to create and implement custom Sass for styling and how to extend your theme’s settings to control the presentation of your new features.
In this lab, you will:
- Add a subcategory listing feature to your storefront’s category pages
- Practice the use of Stencil templates
- Create a custom Sass file
- Create new values in your theme’s settings and utilize them in your presentation
Prerequisites
- Node.js 20 or later
- The Stencil CLI installed on your machine
- A local theme project cloned from Cornerstone, as completed in the previous exercise
- Category and product data as described below
Catalog Data Prerequisites
In order to test the subcategory listing feature, you’ll need to ensure your store’s catalog data matches the following criteria:
- At least one category accessible from the main menu and containing at least three enabled subcategories
- Enabled products assigned to all subcategories mentioned above
You can edit your catalog to meet these criteria in the store control panel, under Products. In the Product Categories tab, create categories as necessary, making sure to specify a parent category to nest one category within another.

Use the product grid interface in _Products > View to assign products to the various categories.
The Subcategory Listing
In this simple Stencil customization, you’ll modify the category page template to display a listing of subcategories, with each displaying a product count and linking to the appropriate category URL.
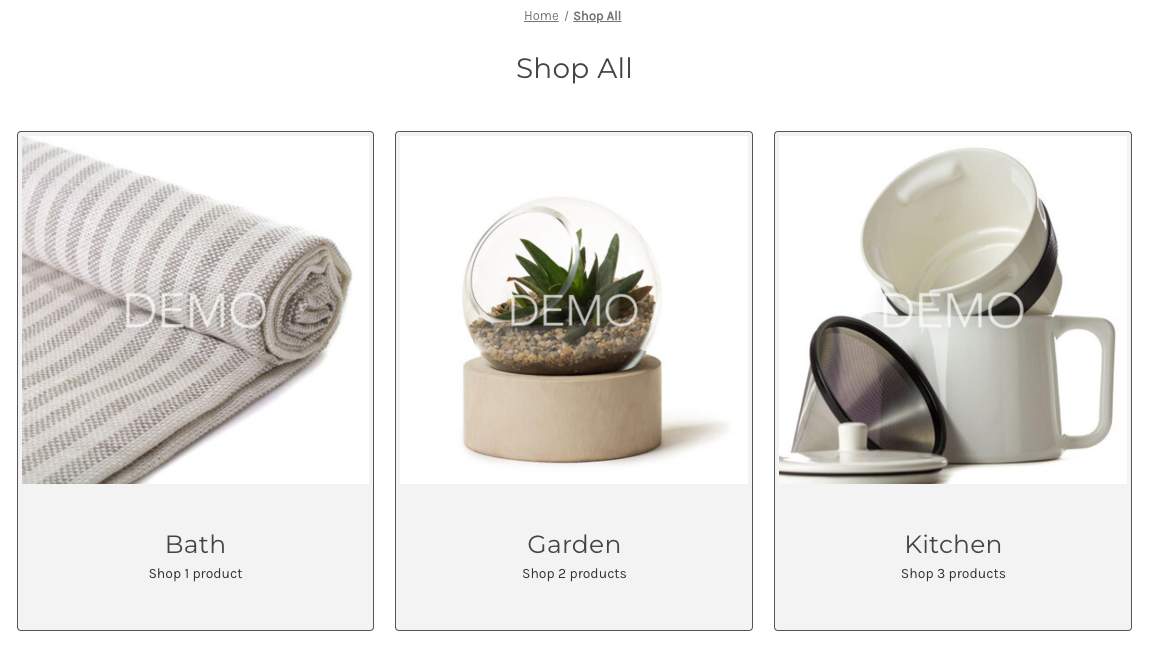
Any category with subcategories will display this presentation instead of the typical product list, while a category without subcategories will display a product listing as usual. This means the shopper navigation experience will be to “drill down” into a category hierarchy until reaching a specific list or products.
Setup
In the local project where you initially cloned Cornerstone, make sure to start the Stencil CLI server process if it’s not running already.
- Run the following from the root directory of the project.
- Browse to the URL listed as the “Local” URL in the console output (usually http://localhost:3000) to make sure your local preview loads successfully.
- Browse to a category that contains subcategories, then add
?debug=contextto the end of the URL. (Example: http://localhost:3000/shop-all?debug=context) - Observe the available information about the current category’s subcategories in the debugging output.
This represents the schema of the data available to your Stencil category template. You will be able to reference category.subcategories within Handlebars expressions to access an array of subcategory objects.
Step 1: Add the Subcategory List Logic
- Locate and open the main category template in the directory templates/pages in your theme project.
- Locate the section of the template in which <aside> and <main> elements are rendered for the category page’s sidebar and main product listing.
- Remove the “else” block rendering an <aside> for subcategories, since this will never be needed with your new presentation strategy.
- Add a Handlebars conditional expression to render the typical <aside> and <main> elements only if there are no subcategories, and to render a placeholder otherwise.
- Browse to a category with subcategories and verify that your placeholder is displayed instead of a product list.
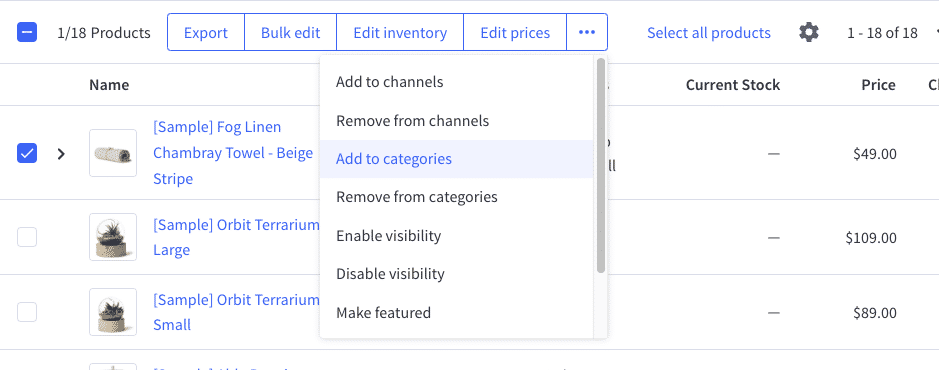
Step 2: Add the Subcategory List Component
Rather than build your subcategory presentation directly in the category page template, you will create a dedicated component for it.
- Create a new file at
components/category/subcategory-listing.html. - Add the subcategory listing markup.
Note that the initial Stencil object referenced for the loop in a Handlebars expression is subcategories, rather than category.subcategories as might be expected based on the schema you observed in the debugging output. This should be cleared up once you add the import for this component file.
This code uses a Handlebars “each” expression to iterate over the array of subcategories. Each subcategory object has properties including url, name, and product count, which you can see are referenced directly within the “each” expression. Within this loop, the Handlebars context is that of each object in the loop.
Finally, note that some values are referencing Stencil object data with a syntax like ../theme_settings.default_image_product. The ”../” in this reference operates similarly to typical file path syntax, accessing an object called theme settings_in the context “above” the current context (in this case, outside the loop). In this case, we are making use of some existing config settings related to lazy load behavior and defaults for the built-in responsive image template.
- Open the main category page template again and replace the previous placeholder with an import of the new component.
This new addition demonstrates how Handlebars context can be changed between templates. While category.subcategories is available from the top level context, this is being “passed” into the component template with the simple alias subcategories. Within the template being imported here, this makes the object data available using that variable name.
- Browse to the category page again and verify that the basic content of the subcategory listing is displayed.
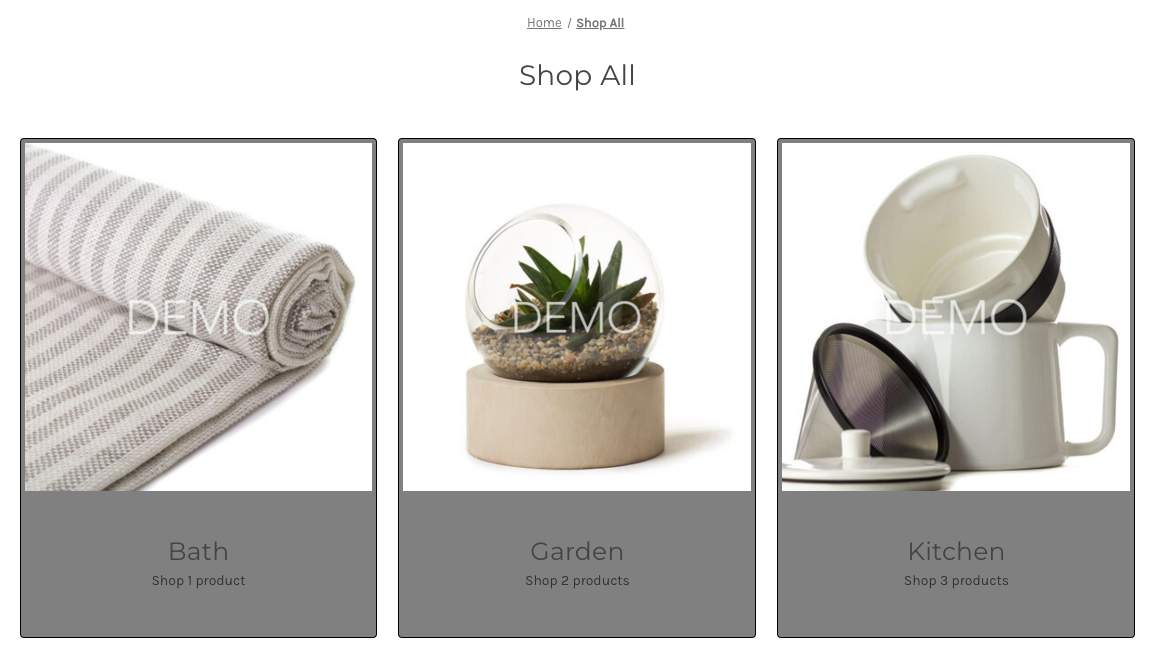
Step 3: Add SCSS Styles
- Create the file assets/scss/components/custom/subcategoryGrid/_subcategoryGrid.scss
- Add the following SCSS code.
This SCSS snippet is using a few built-in mixins, functions, and variables provided by Cornerstone, the Citadel framework, and the underlying Foundation framework in order to implement a standard grid layout and reference common style values. Examples include the u-listBullets mixin that eliminates default bullet points for unordered lists, the breakpoint and spacing functions (supporting standardized values like “single” and “small”), and variables like $global-radius.
This styling will result in a single subcategory per row on the smallest viewports, two per row in viewports with a minimum width matching the “small” breakpoint, and three per row for those matching the “medium” breakpoint.
- Open the main components SCSS file in assets/scss/components/components.scss (This file should contain only imports of other SCSS files.)
- Add an import for the subcategory listing SCSS file.
This components manifest file is, in turn, imported in the main theme SCSS file.
- Browse to the category page again and verify that your new styles take effect.
Step 4: Utilize Theme Settings in SCSS
Currently, the background and border colors for the subcategory listing are hard-coded values. As a final enhancement, you’ll create theme settings for these in config.json instead. By relying on configurable settings, you’ll establish the foundation for easily creating theme variations with a different look and feel, as well as making these presentational elements editable in the Page Builder interface.
Any number of presentational aspects of your component might be made configurable by settings in the same way.
- Open the file config.json.
- In the top-level “settings” object, add new values for the two colors.
- Open the file
assets/scss/components/custom/subcategoryGrid/_subcategoryGrid.scss - Replace the previous hard-coded color values with the
stencilColorfunction, referencing your new theme settings.
- Browse to the category page again and verify that the new default style values take effect.
Taking It Further
To enhance the subcategory listing feature, consider the following additional exercises.
Settings Support in Page Builder
One of the primary uses of the configurable settings whose default values are found in config.json is to make these settings editable within Page Builder in the BigCommerce control panel. Exposing these settings here gives admin users the power to customize various aspects of the look and feel of the storefront without the need for code changes.
In order to make your new settings available in Page Builder, two more files must be edited: schema.json, which defines the available settings and the form controls that will be presented for them, and schemaTranslations.json, which provides localized labels and strings consumed by the schema definitions.
Examine the existing settings in these files, and add the appropriate customizations for your two color fields. Consider making other presentational aspects of the subcategory listing component editable with other settings as well. Keep the following in mind:
- The new settings in schema.json will be added within a specific group (like “Global”) and likely after a specific subheading (like “BackgroundAndLines”).
- The new settings in schema.json should contain an id value corresponding with the keys you already referenced in config.json.
- Many of the settings already in schema.json demonstrate the use of the “color” control type.
Additional Data with GraphQL
If our categories are in a many-leveled hierarchy, we might want our subcategory listing to give shoppers a way to drill down multiple levels in one shot. We could do this by listing each of the subcategories’ own child categories within its card. However, this is not part of the data available in the category.subcategories Stencil objects.
In this case, a query to the GraphQL Storefront API can be used as an alternative method for obtaining the data to work with in your templates, and the query needed here can be embedded directly in the YAML front matter of the category template.
In preparation for pivoting to GraphQL-provided data within your component, study the site.categoryTree query in the GraphQL Storefront API reference and read about the use of GraphQL within front matter in the BigCommerce docs.